
# 一、Nexus简介
Nexus,Maven私服,一个强大的仓库管理器。
# 二、Nexus安装
# Windows安装
windows安装Nexus (opens new window)
# Docker安装
mkdir -p /usr/local/docker/nexus
mkdir /usr/local/docker/nexus/data && chown -R 200 /usr/local/docker/nexus/data
cd /usr/local/docker/nexus
vi docker-compose.yml
1
2
3
4
2
3
4
docker-compose.yml
version: '3.5'
services:
  nexus:
    restart: unless-stopped
    image: sonatype/nexus3:3.23.0
    container_name: nexus
    environment:
      INSTALL4J_ADD_VM_PARAMS: -XX:ActiveProcessorCount=4
    ports:
      - 8081:8081
    volumes:
      - ./data:/nexus-data
      - /etc/localtime:/etc/localtime:ro
1
2
3
4
5
6
7
8
9
10
11
12
13
14
2
3
4
5
6
7
8
9
10
11
12
13
14
说明:
INSTALL4J_ADD_VM_PARAMS: -XX:ActiveProcessorCount=4配置 Nexus 分配给应用程序的内核数。
具体应该分配多少内核数呢?可以在shell命令输入 lscpu 命令查看当前机器的CPU信息。
并使用 [逻辑 CPU 颗数] *[每颗物理 CPU 核数] 计算得出所需配置的数值。
lscpu命令输出结果如下:# CPU 架构 Architecture: x86_64 CPU op-mode(s): 32-bit, 64-bit Byte Order: Little Endian # 逻辑 CPU 颗数 CPU(s): 2 On-line CPU(s) list: 0,1 # 每个核心线程 Thread(s) per core: 1 # 每颗物理 CPU 核数 Core(s) per socket: 2 Socket(s): 1 NUMA node(s): 1 # CPU 厂商 ID Vendor ID: GenuineIntel # CPU 系列 CPU family: 6 # 型号 Model: 158 Model name: Intel(R) Core(TM) i5-7300HQ CPU @ 2.50GHz # 步进 Stepping: 9 # CPU 主频 CPU MHz: 2496.000 BogoMIPS: 4992.00 Hypervisor vendor: VMware # CPU 支持的虚拟化技术 Virtualization type: full # 一级缓存,CPU 的 L1 数据缓存 L1d cache: 32K # 一级缓存,CPU 的 L1 指令缓存 L1i cache: 32K # 二级缓存 L2 cache: 256K # 三级缓存 L3 cache: 6144K NUMA node0 CPU(s): 0,11
2
3
4
5
6
7
8
9
10
11
12
13
14
15
16
17
18
19
20
21
22
23
24
25
26
27
28
29
30
31
32
33
34
35
36
37
启动
运行容器,等待一会。。。
登录
第一次登录,使用默认账户:admin
查看admin密码:
cd /usr/local/docker/nexus/data
ll -a

cat admin.password
1
2
3
4
2
3
4
登录后,修改密码。
配置匿名访问
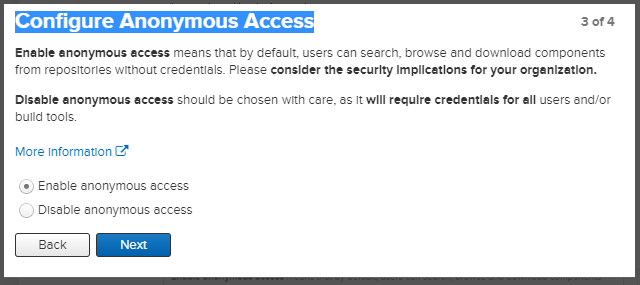
默认情况下,Nexus私服的仓库是允许匿名(anonymous)访问的,也就是任何开发者只要知道你的仓库地址,都可以远程依赖你发布到仓库的库。既然是私服,可能有些库不想要给其他人访问,可以通过设置凭据访问来限制用户访问远程依赖库,最简单的一种就是用户名密码凭据访问。
# 三、Nexus使用
# 修改maven配置文件
在setting.xml
<settings xmlns="http://maven.apache.org/SETTINGS/1.0.0"
          xmlns:xsi="http://www.w3.org/2001/XMLSchema-instance"
          xsi:schemaLocation="http://maven.apache.org/SETTINGS/1.0.0 http://maven.apache.org/xsd/settings-1.0.0.xsd">

  <!-- 配置本地仓库 -->
  <localRepository>D:\Install_java\maven\mavenRepository</localRepository>

  <servers>
    <!-- 配置nexus私服的认证信息 -->
    <server>
        <id>nexus-public</id>
        <username>admin</username>
        <password>admin</password>
    </server>
    <server>
      <id>nexus-releases</id>
      <username>admin</username>
      <password>admin</password>
    </server>
    <server>
      <id>nexus-snapshots</id>
      <username>admin</username>
      <password>admin</password>
    </server>
  </servers>

  <mirrors>
    <!-- 配置我的私服nexus -->
    <mirror>
        <id>nexus-public</id>
        <mirrorOf>*</mirrorOf>
        <name>Nexus Public</name>
        <url>http://192.168.0.200:8081/repository/maven-public/</url>
    </mirror>

    <!-- 配置阿里云镜像 -->
	<mirror>
		<id>alimaven</id>
		<name>aliyun maven</name>
		<url>http://maven.aliyun.com/nexus/content/groups/public/</url>
		<mirrorOf>central</mirrorOf>
	</mirror>
  </mirrors>

  <profiles>
	<!-- 配置jdk版本 -->
	<profile>
	  <id>JDK-1.8</id>
      <activation>
		<activeByDefault>true</activeByDefault>
		<jdk>1.8</jdk>
      </activation>
	  <properties>
		<maven.compiler.source>1.8</maven.compiler.source>
		<maven.compiler.target>1.8</maven.compiler.target>
		<maven.compiler.compilerVersion>1.8</maven.compiler.compilerVersion>
	  </properties>
    </profile>
  </profiles>

</settings>
1
2
3
4
5
6
7
8
9
10
11
12
13
14
15
16
17
18
19
20
21
22
23
24
25
26
27
28
29
30
31
32
33
34
35
36
37
38
39
40
41
42
43
44
45
46
47
48
49
50
51
52
53
54
55
56
57
58
59
60
61
2
3
4
5
6
7
8
9
10
11
12
13
14
15
16
17
18
19
20
21
22
23
24
25
26
27
28
29
30
31
32
33
34
35
36
37
38
39
40
41
42
43
44
45
46
47
48
49
50
51
52
53
54
55
56
57
58
59
60
61
# 修改pom配置
在pom.xml 中配置
- 配置变量
<properties>
	<nexus.hostname>http://192.168.0.200:8081</nexus.hostname>
</properties>
1
2
3
2
3
- 发布项目至私服配置
<distributionManagement>
    <repository>
        <id>nexus-release</id>
        <name>nexus release</name>
        <url>${nexus.hostname}/nexus/content/repositories/releases/</url>
    </repository>
    <snapshotRepository>
        <id>nexus-snapshot</id>
        <name>nexus snapshot</name>
        <url>${nexus.hostname}/nexus/content/repositories/snapshots/</url>
    </snapshotRepository>
</distributionManagement>
1
2
3
4
5
6
7
8
9
10
11
12
2
3
4
5
6
7
8
9
10
11
12
- 私服下载依赖配置
<repositories>
    <repository>
        <id>nexus-public</id>
        <name>my nexus repository</name>
		<url>${nexus.hostname}/nexus/content/groups/public/</url>
    </repository>
</repositories>
1
2
3
4
5
6
7
2
3
4
5
6
7
- 配置插件
<pluginRepositories>
    <!-- 自己搭建的maven私服——nexus -->
    <pluginRepository>
        <id>nexus</id>
        <name>Nexus Plugin Repository</name>
        <url>${nexus.hostname}/repository/maven-public/</url>
        <snapshots>
            <enabled>true</enabled>
        </snapshots>
        <releases>
            <enabled>true</enabled>
        </releases>
    </pluginRepository>
</pluginRepositories>
1
2
3
4
5
6
7
8
9
10
11
12
13
14
2
3
4
5
6
7
8
9
10
11
12
13
14
# 上传第三方包
# 新建仓库
1、登录Nexus后台,选择Repositorys菜单,新建仓库Create repository;
2、选择maven2(hosted);
3、输入自定义仓库名,其余使用默认;
4、将新建的仓库,关联至maven-public库。
# 上传Jar包
1、选择Upload菜单,点击新建的仓库,进行上传操作;
2、点击Browse进行上传Jar包;
3、在Extension中填写jar;
4、填写三剑客,Group ID、Artifact ID、Version。