# 一、InfluxDB基础
InfluxDB GitHub地址 (opens new window)
InfluxDB官方文档(v2.6) (opens new window)
InfluxDB视频教学(从安装到使用 V2) (opens new window)
InfluxDB是专注于时序数据场景的高性能时序型数据库,特别是在IOT(物联网)和监控领域十分常见。
其使用go语言开发,突出特点是性能。
# Influxdb版本
- InfluxDB 1.x
- InfluxDB 2.x
InfluxDB 1.x采用了类似SQL 的InfluxQL语言来操作数据;
2019年1月推出了InfluxDB 2.0 alpha版本,采用全新的查询语言Flux。并在2020年底推出了InfluxDB 2.0正式版本,该版本又分为两个系列:
云模式的
Influx DB Cloud独立部署的
Influx DB OSSTelegraf+InfluxDB2.x实现系统可视化监控。
# Flux语言
InfluxData Flux documentation (opens new window)
Flux(以前称为IFQL)是一种开源函数式数据脚本语言,用于查询、分析和处理数据。
Flux支持多种数据源类型,包括:
时间序列数据库(如InfluxDB)
关系型SQL数据库(如MySQL和PostgreSQL)
CSV格式
Flux不是绑定在InfluxDB上的查询脚本语言,它是一个独立的项目,图灵完备,便于处理数据,也可以用作于InfluxDB之外。
# InfluxDB特性
- 高效的时间序列数据写入性能。自定义TSM引擎,快速数据写入和高效数据压缩。
- 无额外存储依赖。
- 简单,高性能的HTTP查询和写入API。
- 以插件方式支持许多不同协议的数据摄入,如:graphite、collectd、openTSDB。
- SQL-like查询语言,简化查询和聚合操作。
- 索引Tags,支持快速有效的查询时间序列。
- 保留策略有效去除过期数据。
- 连续查询自动计算聚合数据,使频繁查询更有效。
# 应用场景
InfluxDB是专注于时序数据场景,广泛应用于DevOps监控、IoT监控、实时分析等场景。
例如:应用于机房运维监控、物联网IoT设备采集存储、互联网广告点击分析等基于时间线且多源数据连续涌入数据平台的应用场景。
# 优势
InfluxDB专注于DevOps监控、IoT监控等场景,针对时序存储、高性能读写、实时操作、高可用性而设计的一套软件,从零设计架构和开发,InfluxDB通过实现高度可扩展的数据接收和存储引擎,可以高效地实时收集、存储、查询、可视化显示和执行预定义操作。
它通过采样和数据保留策略,以支持将高价值、高精度数据保存在内存中,将低价值数据保存到磁盘。
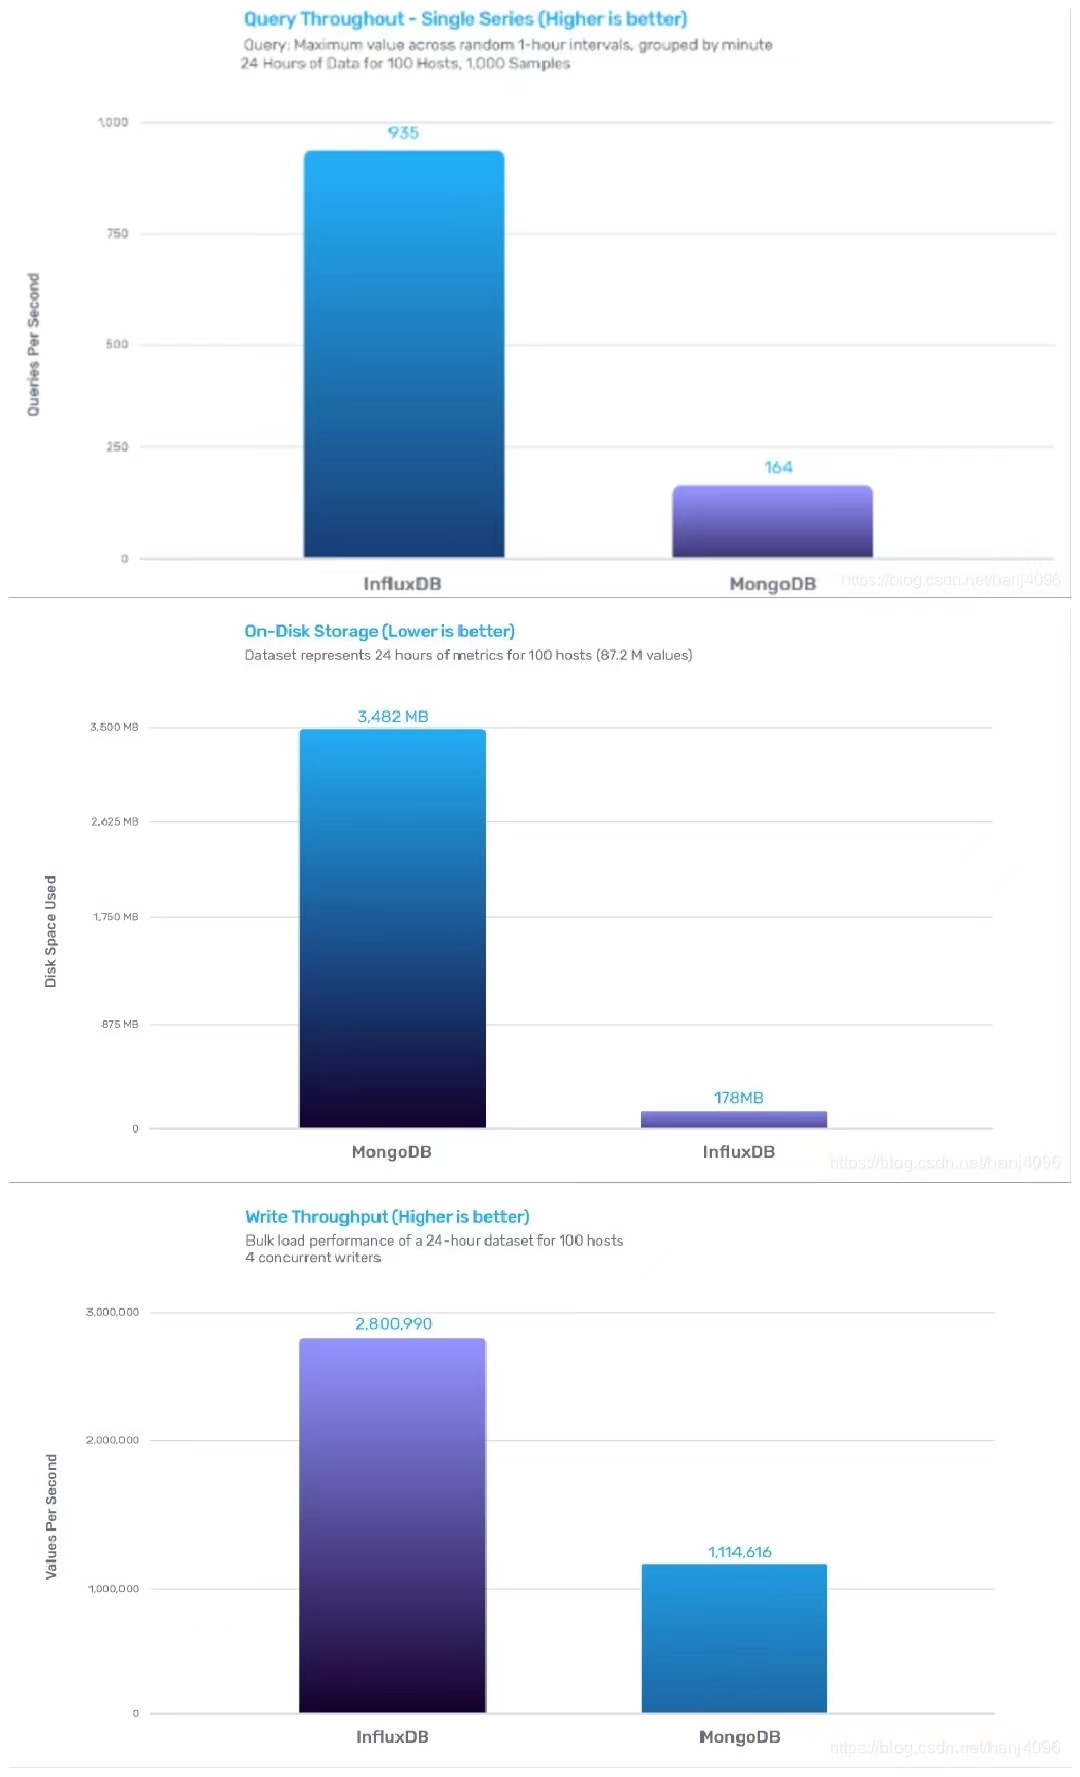
作为一套精心设计、架构卓越的专用系统,相比OpenTSDB、MongoDB、Graphite、Cassandra等,InfluxDB的性能优势和成本优势明显。
InfluxDB与MongoDB对比
InfluxDB的写性能是MongoDB的2.4倍,存储效率是MongoDB的20倍,查询效率是MongoDB的5.7倍。
# Influxdb部署
单机版和集群版。
单机版开源;集群版已闭源,走商业路线。
# 二、InfluxDB名词
| influxDB中的名词 | 传统数据库中的概念 |
|---|---|
bucket | 数据库 |
measurement | 数据库中的表 |
point | 表里面的一行数据 |
# bucket
桶,类似于关系型数据库中的database。
# measurement
测量指标名,对应传统数据库中的表。
# Timestamp
既然是时间序列数据库,influxdb的数据都有一列名为_time的列,里面存储UTC时间戳。
时间戳的精度可以达到纳秒级(NS),即19位Long类型。
以RFC3339格式显示(2020-01-01T00:00:00.00Z)。
每一条数据都需要指定一个时间戳,在 TSM 存储引擎中会特殊对待,为了优化后续的查询操作。也可以传入指定时间。
# Point
表示每个表里某个时刻的某个条件下的一个 field 的数据,因为体现在图表上就是一个点,于是将其称为 point。
Point由时间戳(time)、数据(field)、标签(tags)组成。
Point相当于传统数据库里的一行数据,如下表所示:
| Point属性 | 传统数据库中的概念 |
|---|---|
| time | 每个数据记录时间,是数据库中的主索引(会自动生成) |
| fields | 各种记录值(没有索引的属性) |
| tags | 各种有索引的属性 |
Time 每一条数据都需要指定一个时间戳,在 TSM 存储引擎中会特殊对待,为了优化后续的查询操作。也可以传入指定时间。
field 字段字段由field key和field value组成。field是没有索引的。如果使用这些字段作为查询条件,会扫描符合查询条件的所有字段值。
field key为string类型;field value可以是string,float,integer或boolean类型。
tags标签由tag key和tag value组成。tag是有索引的。tags相当于SQL中的有索引的列,将经常查询的列设定为tag标签。
tag key为string类型;tag value只能是string类型 。
# 目录与文件结构
InfluxDB 的数据存储主要有三个目录。
默认情况下是 meta, wal 以及 data 三个目录。
meta 用于存储数据库的一些元数据,meta 目录下有一个 meta.db 文件。
wal 目录存放预写日志文件,以 .wal 结尾。
data 目录存放实际存储的数据文件,以 .tsm 结尾。
# 三、InfluxDB下载与安装
# 1、windows安装(v2)
# (1 下载解压
InfluxDB官方下载地址(v2):https://docs.influxdata.com/influxdb/v2.6/install/?t=Windows (opens new window)
InfluxDB官方下载安装文档(v2.6) (opens new window)
端口服务
8086:HTTP API 的端口
解压
下载之后解压至指定目录。
# (2 指定目录配置选项
配置方式
在InfluxDB的执行目录存放一个config.*的文件即可,config支持json,toml,yaml格式。InfluxDB启动时会自动检测这个文件。
配置参数(核心)
bolt-path:BoltDB数据库的路径。用来存放influx用户数据、组织、库等。BoltDB是一个用Go编写的键值存储,InfluxDB使用BoltDB存储数据,包括组织和用户信息、UI数据、REST资源和其他关键价值数据。engin-path: 用来存放时序数据的文件夹目录。sqlite-path:用来存放一些元数据。flux-log-enabled:启用日志,默认false。query-memory-bytes:单个查询允许的最大内存字节数,默认值:无限制(unlimited)。log-level:日志级别,支持debug、info、error,默认是info。http-bind-address:influxdb HTTP API的地址和端口号,默认“:8086“,冒号前面是ip地址。http-read-timeout:读取请求超时时间,默认不限制。http-write-timeout:写入请求超时时间,默认不限制。
配置示例
config.json
{
    "bolt-path":"D:\\install_java\\influxdb2\\data\\influxd.bolt",
    "engine-path": "D:\\install_java\\influxdb2\\data\\engine",
    "sqlite-path": "D:\\install_java\\influxdb2\\data\\influxd.sqlite",
    "flux-log-enabled": true,
    "query-memory-bytes": 104857600,
    "log-level": "info",
    "http-bind-address": ":8086",
    "http-read-timeout": "10s",
    "http-write-timeout": "10s"
}
2
3
4
5
6
7
8
9
10
11
其他还有很多参数可以参看官网说明:
InfluxDB官方文档——配置选项(v2.6) (opens new window)
# (3 运行访问
cmd进入解压目录,执行influx.exe;
通过http://localhost:8086/ (opens new window),访问图形化UI进行安装(Setup)。
# 扩展:添加windows服务
1、下载 nssm软件
下载链接:
链接:https://pan.baidu.com/s/1oH90DowxG9vbflq3eY-AWw
提取码:60dv
2
下载下来之后是一个压缩包进行解压,找到对应你自己系统的32/64位nssm。
2、install服务
找到解压路径下的nssm目录,在cmd窗口中执行 nssm install <服务名>。
nssm install influxdb2
在回车出现nssm的配置界面,填写你的influxd.exe安装地址;
点击 install service ,就建立成功。
在计算机服务中就可以看到刚刚建立的server了,右键点击启动,就可以启动该服务了。
3、设置启动类型
在服务中右键点击打开服务,在启动类型中进行选择自动,配置开机自启。
# 2、基于 Docker 安装(v2)
docker-compose.yml
version: '3'
services:
  influxdb:
    image: influxdb:2.6.1
    container_name: influxdb2
    restart: unless-stopped
    ports:
      - '8086:8086'
    volumes:
      - ./data:/var/lib/influxdb2:rw
      - ./config.yml:/etc/influxdb2/config.yml:rw
2
3
4
5
6
7
8
9
10
11
或者config.yml
bolt-path: '/var/lib/influxdb2/influxd.bolt'
engine-path: '/var/lib/influxdb2/engine'
sqlite-path: '/var/lib/influxdb2/influxd.sqlite'
http-bind-address: ':8086'
http-read-timeout: 10s
http-write-timeout: 10s
query-memory-bytes: 104857600
flux-log-enabled: true
log-level: info
2
3
4
5
6
7
8
9
启动后通过http://localhost:8086/ (opens new window),访问图形化UI进行安装(Setup)。


# 四、InfluxDB 命令(v2)
# setup
通过命令行的方式进行初始化。
influx setup \> --username dbadmin \> --password mypna123 \> --host http://localhost:8086 \> --org userservice-org \> --bucket userredis-identity \> --retention 21900h \> --force
# 组织org
org organization 组织
organization是一组用户的工作空间,一个组下用户可以创建多个bucket。
# 桶bucket
bucket(桶),所有的 influxdb数据都存储在bucket中,bucket结合了数据库和保存期限(每条数据会被保留的时间)的概念,类似于RDMS的database的概念。
bucket属于一个organization。
# 查询所有的bucket
influx bucket list -o brddmorg

# 新增bucket
influx bucket create --name test
2
3
4
5
# 用户user
# 查看所有用户
influx user list
2
# 行协议
# 五、Java集成Influx DB(v2)
influxdata client API 官方文档 (opens new window)
官方提供目前只提供了通过http api访问数据库的方式。我们用GitHub上的开源框架与数据库进行交互。
项目地址为:https://github.com/influxdata/influxdb-client-java (opens new window)
This repository contains the reference JVM clients for the InfluxDB 2.x. Currently, Java, Reactive, Kotlin and Scala clients are implemented.
Note: Use this client library with InfluxDB 2.x and InfluxDB 1.8+ (see details). For connecting to InfluxDB 1.7 or earlier instances, use the influxdb-java client library.
# pom依赖
pom引入依赖
<dependency>
  <groupId>com.influxdb</groupId>
  <artifactId>influxdb-client-java</artifactId>
  <version>6.3.0</version>
</dependency>
2
3
4
5
# Initialize the Client
package example;

import java.time.Instant;
import java.util.List;

import com.influxdb.annotations.Column;
import com.influxdb.annotations.Measurement;
import com.influxdb.client.InfluxDBClient;
import com.influxdb.client.InfluxDBClientFactory;
import com.influxdb.client.WriteApi;
import com.influxdb.client.domain.WritePrecision;
import com.influxdb.client.write.Point;
import com.influxdb.query.FluxTable;

public class InfluxDB2Example {
  public static void main(final String[] args) {

    // You can generate an API token from the "API Tokens Tab" in the UI
    String token = System.getenv("INFLUX_TOKEN");
    String bucket = "mpdm3";
    String org = "TEST";

    InfluxDBClient client = InfluxDBClientFactory.create("http://localhost:8086", token.toCharArray());
  }
}
2
3
4
5
6
7
8
9
10
11
12
13
14
15
16
17
18
19
20
21
22
23
24
25
# Write Data
Option 1: Use InfluxDB Line Protocol to write data
String data = "mem,host=host1 used_percent=23.43234543";

WriteApiBlocking writeApi = client.getWriteApiBlocking();
writeApi.writeRecord(bucket, org, WritePrecision.NS, data);
2
3
4
Option 2: Use a Data Point to write data
Point point = Point
  .measurement("mem")
  .addTag("host", "host1")
  .addField("used_percent", 23.43234543)
  .time(Instant.now(), WritePrecision.NS);

WriteApiBlocking writeApi = client.getWriteApiBlocking();
writeApi.writePoint(bucket, org, point);
2
3
4
5
6
7
8
Option 3: Use POJO and corresponding class to write data
Mem mem = new Mem();
mem.host = "host1";
mem.used_percent = 23.43234543;
mem.time = Instant.now();

WriteApiBlocking writeApi = client.getWriteApiBlocking();
writeApi.writeRecord(bucket, org, WritePrecision.NS, mem);


@Measurement(name = "mem")
public static class Mem {
  @Column(tag = true)
  String host;
  @Column
  Double used_percent;
  @Column(timestamp = true)
  Instant time;
}
2
3
4
5
6
7
8
9
10
11
12
13
14
15
16
17
18
19
# Execute a Flux query
String query = "from(bucket: \"mpdm3\") |> range(start: -1h)";
List<FluxTable> tables = client.getQueryApi().query(query, org);

for (FluxTable table : tables) {
  for (FluxRecord record : table.getRecords()) {
    System.out.println(record);
  }
}
2
3
4
5
6
7
8
# Dispose the Client
client.close();
# 六、数据操作
# 数据迁移
InfluxDB中的数据存储在数据块(data shard)中,每个数据块都包含一段时间范围内的数据。
当需要将大量数据从一个InfluxDB实例迁移到另一个实例时,需要考虑以下几个方面:
使用导出和导入功能:InfluxDB提供了
influxd backup和influxd restore命令,可以将整个数据库备份到一个文件中,然后在另一个实例上进行恢复。这种方法适用于数据量不大且可中断的情况。参考官方文档——Back up Data (opens new window)
使用HTTP API:InfluxDB提供了HTTP API,可以使用
/query和/write端点将数据从一个实例迁移到另一个实例。可以编写一个脚本或应用程序,使用HTTP API查询数据并将其写入到目标实例中。这种方法适用于需要对数据进行处理或转换的情况。直接复制数据文件:InfluxDB使用TSM格式存储数据,每个数据块对应一个TSM文件。可以将TSM文件从源实例复制到目标实例,然后重新启动目标实例以加载新的数据。这种方法适用于数据量巨大的情况,但需要注意在复制文件时应该先停止目标实例。
需要注意的是,在进行大量数据迁移时,应该先备份源实例的数据以防止数据丢失或损坏。此外,迁移期间还应该进行数据一致性检查,以确保目标实例中的数据与源实例中的数据相同。
# 安装 Influx CLI
从InfluxDB2.1开始,influxCLI与InfluxDB已分离,需单独下载。 下载influx CLI: https://docs.influxdata.com/influxdb/v2.2/reference/cli/influx (opens new window)
# 数据导出
数据导出(备份):https://docs.influxdata.com/influxdb/v2.6/reference/cli/influx/backup (opens new window)
案例:
influx backup ./backup-all/ --host http://localhost:8086/ -t FZQzjAArqEggUriChBt5f7r0ce-ZHiuzqQhh9qO_Zr4kqtLSaOSARJxXv4zAVnktVwhhEwv81DixiVhw3YBS4g==
# 数据导入
数据导入(恢复):https://docs.influxdata.com/influxdb/v2.6/reference/cli/influx/restore (opens new window)
案例:
influx restore --full ./backup-all/
或者
influx restore ./backup-all/ --host http://localhost:8086/ -t FZQzjAArqEggUriChBt5f7r0ce-ZHiuzqQhh9qO_Zr4kqtLSaOSARJxXv4zAVnktVwhhEwv81DixiVhw3YBS4g==
参考
https://blog.csdn.net/weixin_46560589/article/details/127748939 (opens new window)
https://www.cnblogs.com/juanxincai/p/16964391.html (opens new window)
# 其他命令
influxd inspect
influx write
参考
https://blog.csdn.net/weixin_39554102/article/details/126141212 (opens new window)
# 七、补充扩展知识
# 时区问题
另外influxdb还有时区的问题,他默认使用的是UTC时区,和中国差了8小时。
# 动态传入@Measurement的名称
由于业务需要“灵活可配置”的功能需求,在使用java开发Influxdb查询功能的时候,遇到了一个问题,Measurement注解的名称有可能需要动态变化。
问题可以转换为:
在@Measurement 注解生效之前,将变动的name值写入。
解决:
使用java反射去解决,主要需要操作以下两个类的api:
java.lang.reflect.InvocationHandler;

java.lang.reflect.Proxy;
2
3
最终解决方案,通过继承 InfluxDBResultMapper 的 toPOJO 方法得以解决。
以下贴出代码:
public class InfluxDBResultMapperHelper extends InfluxDBResultMapper {

    public <T> List<T> toPOJO(final QueryResult queryResult, final Class<T> clazz,String name)
            throws InfluxDBMapperException {
        InvocationHandler handler = Proxy.getInvocationHandler(clazz.getAnnotation(Measurement.class));
        Field hField = null;
        try {
            hField = handler.getClass().getDeclaredField(ME_VALUE);
            hField.setAccessible(true);
            Map memberValues = (Map) hField.get(handler);
            memberValues.put(ME_NAME, name);
        } catch (NoSuchFieldException e) {
            e.printStackTrace();
        } catch (IllegalAccessException e) {
            e.printStackTrace();
        }
        return toPOJO(queryResult, clazz, TimeUnit.MILLISECONDS);
    }
}
2
3
4
5
6
7
8
9
10
11
12
13
14
15
16
17
18
19
# 行转列-pivot函数
例:
查询1:Query mem_used and mem_total fields
from(bucket: "gpu-monitor")
|> range(start: 2020-01-01T00:00:00Z)
|> filter(fn: (r) => r._measurement == "gpu" and r._field =~ /mem_/)
2
3
Returns the following stream of tables:
| _time | _measurement | _field | _value |
|---|---|---|---|
| 2020-01-01T00:00:00Z | gpu | mem_used | 2517924577 |
| 2020-01-01T00:00:10Z | gpu | mem_used | 2695091978 |
| 2020-01-01T00:00:20Z | gpu | mem_used | 2576980377 |
| _time | _measurement | _field | _value |
|---|---|---|---|
| 2020-01-01T00:00:00Z | gpu | mem_total | 8589934592 |
| 2020-01-01T00:00:10Z | gpu | mem_total | 8589934592 |
| 2020-01-01T00:00:20Z | gpu | mem_total | 8589934592 |
查询2:Pivot fields into columns
使用 pivot() 将 mem_used 和 mem_total 字段转换为列。 输出包括 mem_used 和 mem_total 列,每个列都有值 对应的_time。
// ...
|> pivot(rowKey:["_time"], columnKey: ["_field"], valueColumn: "_value")
2
返回以下内容:
| _time | _measurement | mem_used | mem_total |
|---|---|---|---|
| 2020-01-01T00:00:00Z | gpu | 2517924577 | 8589934592 |
| 2020-01-01T00:00:10Z | gpu | 2695091978 | 8589934592 |
| 2020-01-01T00:00:20Z | gpu | 2576980377 | 8589934592 |
参考文档:https://www.bookstack.cn/read/InfluxDB-2.0-en/81c64e846b9bacb9.md (opens new window)
# 八、相关资料
InfluxDB GitHub地址 (opens new window)
InfluxDB官方文档(v2.6)https://docs.influxdata.com/influxdb/v2.6 (opens new window)
InfluxDB官方下载地址(v2):https://docs.influxdata.com/influxdb/v2.6/install/?t=Windows (opens new window)
influxdata client API 官方文档 (opens new window)
Use InfluxDB client libraries (opens new window)